Add-Ins are used to extend the functionality provided by MyGeotab and Geotab Drive. An Add-In is JavaScript, HTML and CSS loaded into the MyGeotab or Geotab Drive portal and resides directly inside the user interface. This allows third-parties to create a seamless user experience and provide solutions that would otherwise require the user to visit a different website altogether. Click here to find the sample Add-Ins.
The Add-In generator is a great developer tool that allows integrators to create scaffolded Add-In projects. You can learn more about the generator and all of its features by going into the generator-addin repository.
Geotab Add-Ins can be of two types
Pages
A custom page Add-In can be thought of as a complete web application inside your Geotab account. A custom page Add-In has access to the MyGeotab API and the current page state. With custom pages you can develop business-aware Add-Ins by combining MyGeotab data with your own APIs.
Buttons
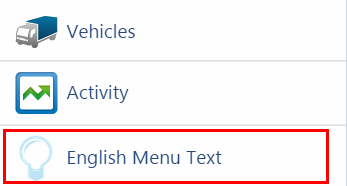
Custom button Add-Ins can be included to perform different functions. Additional navigational buttons can be dynamically inserted inside certain areas of the MyGeotab user interface. This allows custom button Add-Ins to provide a simple way for users to reach your custom page Add-In (see Image 1). Buttons can also be placed on pages to execute functions for automation of routine tasks, such as report generation (see Image 3).
Use cases
Consider a manager who regularly performs similar tasks each day. Their workflow may consist of comparing fleet metrics with local data from your software. By creating a custom page Add-In, you can combine both of these tasks into one easy-to-use page where all the information is readily available.
Another example is to quickly navigate between different areas of Geotab. A simple-to-use one-click button Add-In can be made for most pages. The button will guide the user between areas, and can optionally use the page state to automatically fill in URL parameters to run reports with a single click.
Requirements
The Add-Ins created must have their source code stored externally using your own hosting provider or your own servers.
Referenced files must be publicly accessible via HTTPS and all hosted resources must be on a server that supports TLS 1.2 or higher.
Accessibility
Add-ins must comply with WCAG 2.2 Level AA accessibility. Automated tools like Chrome Lighthouse can test the majority of these requirements. To cover any remaining requirements, Lighthouse provides a list of manual test steps that can be done using a screen reader such as VoiceOver.
Add-In configuration files
Each Add-In created will have one configuration file. The configuration file is a JSON file (http://www.json.org) of keys and values which describes the Add-In, who is responsible for it, what source code it contains, and a digital security signature.
Table 1 - Add-In configuration file keys/values
| Property | Description | Type | Required version |
|---|---|---|---|
| name | The name of this Add-In | String | |
| supportEmail | Email address for support related to this Add-In | String | |
| items | Array of custom pages and/or buttons (External references) | Array | |
| files | Custom pages and/or buttons (Embedded code) | Object | |
| key | Unique MyGeotab Marketplace Add-In key assigned by Geotab. If there's no plan to get your Add-In to the Marketplace, you can leave out the key/value pair from the Configuration File | String | |
| signature | Digital signature of the Add-In | String | |
| version | The version of the Add-In | String | |
| enableViewSecurityId | If true, a "View {ADDIN_NAME} add-in" security clearance feature is created that must be enabled for users to be able to view the Add-In | Boolean | MyGeotab v9.0+ |
| securityIds | An array of custom security IDs that are added to the list of features available when editing clearances. These definitions can support multiple languages. e.g. "securityIds": [{"name": "ExampleSecurityIdentifier1", "en": "Example Security Identifier 1"},
{"name": "ExampleSecurityIdentifier2", "en": "Example Security Identifier 2"}] | Array | MyGeotab v9.0+ |
If you do not know your MyGeotab Add-In key, please contact your authorized Geotab reseller for support.
The Add-In configuration file can specify the contents using either the Items, Files property, or a combination of both. It is recommended to use Items and externally referencing the source code to make development and debugging easier. When ready, the code can be embedded directly on Geotab's servers.
Example Add-In configuration file
The Add-In configuration file below demonstrates how to define a simple Add-In which references an HTML page specified by its URL. Any CSS or JavaScript which is required by the Add-In would be specified in the referenced HTML.
Listing 1 - A simple Add-In configuration JSON file
Test the example above by navigating to Administration → System → System Settings → Add-Ins. Select New Add-In and paste the example in the configuration tab. Be sure to select save then refresh the page.
Page Add-In navigation menu location
Each Add-In can create a navigation entry in the left hand side menu. This allows quick and easy access to all of the Add-Ins. The placement of the navigation entry for the Add-In is specified in the configuration file, relative to another built-in navigation entry. In the section below, a navigation entry is placed directly after the Activity entry. A user with English as their interface language will see "English Menu Text" as the label. Note that we show only two properties for brevity.
The Add-In navigation entry can be placed after any of the following built-in values:
GettingStartedLinkActivityLinkEngineMaintenanceLinkZoneAndMessagesLinkRuleAndGroupsLinkAdministrationLink
To place the navigation entry as a sub-menu entry in one of the main entries, place a slash (/) character after the name. The custom entry will be the first item inside the sub-menu.
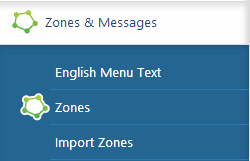
For example, by changing "ZoneAndMessagesLink/" as the value for the "path" key:
"path": "ZoneAndMessagesLink/",This will insert the custom navigation entry as follows:
Navigation entries cannot be set at the third level (sub-sub-menu) and below. If done so by the steps outlined above, the entry will simply appear as a non-formatted bullet point in the menu.
A user may not have access to some entries of the left hand side menu. The custom navigation entry will be shown after the nearest entry which is accessible to them.
Using third-party libraries
Add-Ins can include references to external libraries that have been custom developed or to existing libraries such as jQuery. This is performed in the traditional way by including a <script> tag to the URL of the file.
Listing 7 - Referencing jQuery from an Add-In
Keep in mind that the end-user using the Add-In will be viewing your Add-In from a Geotab server. The files referenced must be publicly available on the Internet. Firewalls cannot be configured with a specific IP address for the Geotab server as the address may change in the future.
References to external source files can either be absolute URLs such as the example in Listing 7 or can be relative references to local files as demonstrated in Listing 3.
Listing 8 - Avoiding CSS naming conflicts
When referencing the CSS files, keep in mind that naming conflicts are possible. Geotab's outer framework defines a number of CSS styles for common HTML tags which the custom Add-In may inherit. When designing HTML tags, it is recommended to prefix the HTML tags with a common name when they are stylized with the CSS.
Page lifecycle
When designing a custom page Add-In, it is important to understand the JavaScript events that take place on Geotab's servers. The user-defined JavaScript code must supply an entry point object which will be created with a predefined parameter signature. From these parameters, a signed-in Geotab API object will be received, along with the page state and a callback synchronization function.
Every page on Geotab's servers, including custom page Add-Ins, have the following three methods called during their lifecycle:
Table 5 - Add-In lifecycle methods
| Method | Description | Signature |
|---|---|---|
| initialize | Called only once when your custom page is first accessed. Use this method to initialize variables required by your Add-In. | function(api, state, callback) {... } |
| focus | This method is called after the user interface has loaded or the state of the organization filter is changed. Use this method for initial interactions with the user or elements on the page. | function(api, state) {... } |
| blur | This method is called when the user is navigating away from your page. Use this method to save any required state. | function(api, state) {... } |
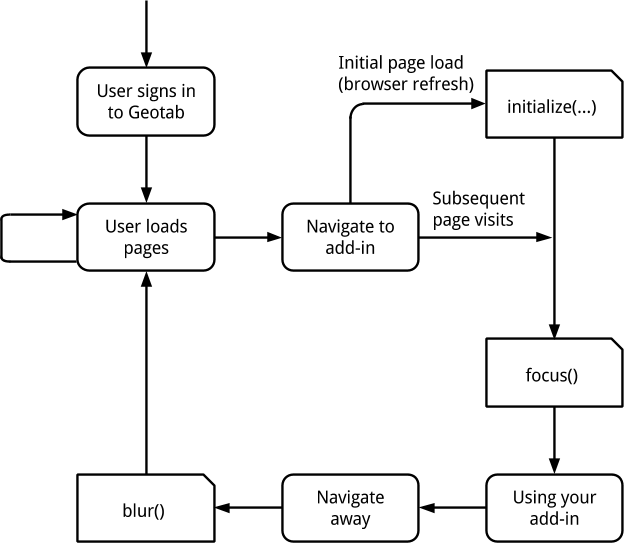
Visual diagram
Understanding the workflow and methods called will help you design a responsive custom page Add-In. Keep in mind that your initialize method will only be called once, unless the user explicitly refreshes their web browser. When the user interface is ready, the focus method will be called. Finally, when the user is navigating away from your custom page Add-In, the blur method will be called, completing the Add-In lifecycle.
It's important to call the callback passed into initialize after all work is complete. Keep in mind the asynchronous nature of JavaScript.
Lifecycle implementation
The following code can be used as a starting point for a custom page Add-In. All of the lifecycle methods are defined, and the optional focus and blur methods will be called due to the callback method being called in the initialize method.
Use the commented area to define and then assign variables in the scope of the Add-In. Each of the Add-Ins will need to define its own unique namespace with the prefix geotab.addin (note that the namespace is not hyphenated). In the example below, the full namespace is geotab.addin.myCustomPage1.
Listing 9 - HTML and JavaScript entry point example
Custom button Add-Ins
Custom button Add-Ins allow you to extend the capabilities of a built-in Geotab page by appending a new button to the top menu of the page. When a user clicks the custom button Add-In, the JavaScript method that has been defined will be called. This JavaScript method has access to the event which was generated by the click, the Geotab API under the credentials of the current user, and the page state variables.
Button Add-In configuration file
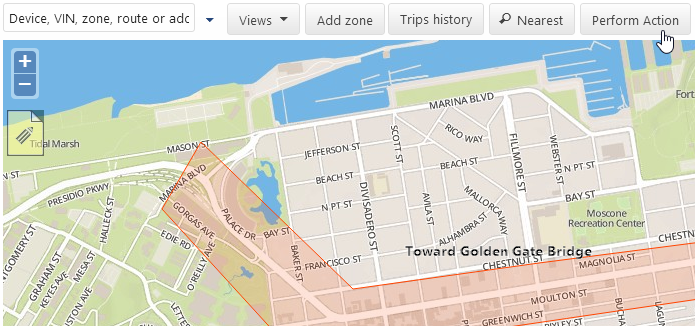
The following example adds a custom button Add-In to the live map page. When clicked, the button will redirect the user to the vehicles page. Use this example as a starting point for creating your own custom button Add-Ins.
The exact position of the custom button Add-In within a built-in page is defined by the developer. For instance, in Image 3, a new button labeled Perform Action is added to the toolbar of the live map page.
This example uses external references to the source code. Similar to custom page Add-Ins, the Files property of the configuration file can be used to embed the source code on the Geotab servers.
Use cases
The action your custom button Add-In performs is decided by your specific business requirement. The following are example actions that can be implemented:
- One-click navigation between maps and reports
- Call an API to alert for driver proximity
- Create a new zone at the current location
- Automated execution of a sequence of actions
Listing 10 - Custom button Add-In configuration file
Almost any page is available to have a custom button Add-In added to it. Use a web browser's address bar to find the correct value for the Page property. Geotab pages will have a trailing hash (“#”) symbol followed by the page name. Determine the page name and then set the “page” value of your custom button Add-In configuration file to that value.
JavaScript button action
When a custom button Add-In is clicked by a user, it will execute a predefined method from the JavaScript file referenced. This method provides the button action with access to the generated event, the Geotab API as the signed-in user, and the page state.
To avoid conflicts with multiple Add-Ins enabled on an account, be certain to create unique namespaces for each Add-In.
Listing 12 - Custom button click method
The state object is a powerful tool for creating navigational components by changing the current page state. The state object has access to a number of methods as follows:
Table 6 - Geotab page state methods
| Method | Description | Parameters | Return type |
|---|---|---|---|
getState | Gets an object that represents the current URL state | None | Object |
setState | Sets the current URL state. The object parameter is a modified state retrieved from getState | Object | Void |
gotoPage | Redirects the user to another page with optional parameters. Example: state.gotoPage("map", {someParameter1: true, someParameter2: 5 }); | String, [Object] | Void |
hasAccessToPage | Checks whether the current user has the security clearance to view a page by its # (hash) value. Example: var result = state.hasAccessToPage("map"); | String | Boolean |
getGroupFilter | Gets an array with ids of the selected groups in the organization filter. Example: var result = state.getGroupFilter(); | None | Array |
getAdvancedGroupFilter | Gets an object with a relation property and a groupFilterConditions array of the selected groups in the organization filter. Example: var result = state.getAdvancedGroupFilter(); | None | Object |
The second parameter to the gotoPage method is optional and is used for query string parameters.
Complete integration example
Using all the concepts outlined in this document, the following is a complete integration example which creates a custom page Add-In with real-world functionality. In this example, the custom page has JavaScript methods that make requests using the Geotab API to retrieve the current vehicles on your account. The result of the API request is shown on the custom page in a list. Finally, when the user leaves the page, the custom page performs cleanup during the lifecycle methods.
For the purpose of this example, the integrationExample.css and integrationExample.js are empty files.
Source code
Listing 13 - HTML and JavaScript code for integration example
Listing 14 - Configuration file for integration example
Troubleshooting and debugging
When developing Add-Ins, the use of Google Chrome and its Developer Tools window is recommended. To open the Chrome Developer Tools on Windows, press CTRL + SHIFT + I; on a Mac, press CMD + OPTION + I.
The contents of console.log("...") statements can be examined using the Developer Tools, the timeline of XML HTTP requests can be viewed, and breakpoints to step through the JavaScript source code can be created.
It is also recommended to read Google's extensive learning resources available on using Chrome Developer Tools to get started debugging or learn about the advanced features they have available.
Note: Add-Ins that were locally added to a database in the past (recommended approach is to host on a server externally) might throw the error message "Add-In threw an error. Please contact your administrator." To further confirm, the following error will appear in the browser console (found by hitting CTRL+SHIFT+I): Error: Add-In files: <add-in file name> couldn't be loaded. Probably they were moved to another location or removed. This could be linked to a server maintenance/migration event. The workaround would be to re-upload the files for the Add-Ins back to the database, while the resolution would be to externally host the source code as per the requirements listed here.
Add-In icon validator
The Add-In Icon Validator tests uploaded SVG files against Geotab's requirements and displays them in the reformatted colors and style that will be displayed in MyGeotab.